Featured Post
Best Homemade Dog Shampoo: All Natural Oatmeal Dog Shampoo
I found this DIY dog shampoo at this link. Within the post is a link to her homemade flea shampoo. https://www.freebiefindingmom.com/b...

Monday, November 25, 2013
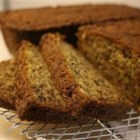
Extreme Banana Nut Bread
Made this banana nut bread over the weekend. oh em gee!! Da bomb!! Here's the link to where I found it.
http://allrecipes.com/Recipe/Extreme-Banana-Nut-Bread-EBNB/Detail.aspx
http://allrecipes.com/Recipe/Extreme-Banana-Nut-Bread-EBNB/Detail.aspx
Extreme Banana Nut Bread 'EBNB'
|
 |
Submitted By: SASEIGEL
Photo By: Noty
|
"This is my mom's dense, excellent, and definitely unhealthy banana nut bread recipe. It's always completely gone in minutes. This is great at parties, but hazardous at home. HEALTH WARNINGS: EBNB may be habit forming."
INGREDIENTS:
2 cups all-purpose flour
1 teaspoon salt
2 teaspoons baking soda
1 cup butter or margarine
|
2 cups white sugar
2 cups mashed overripe bananas
4 eggs, beaten
1 cup chopped walnuts
|
DIRECTIONS:
| 1. | Preheat the oven to 350 degrees F (175 degrees C). Grease and flour two 9x5 inch loaf pans. |
| 2. | Sift the flour, salt and baking soda into a large bowl. In a separate bowl, mix together the butter or margarine and sugar until smooth. Stir in the bananas, eggs, and walnuts until well blended. Pour the wet ingredients into the dry mixture, and stir just until blended. Divide the batter evenly between the two loaf pans. |
| 3. | Bake for 60 to 70 minutes in the preheated oven, until a knife inserted into the crown of the loaf comes out clean. Let the loaves cool in the pans for at least 5 minutes, then turn out onto a cooling rack, and cool completely. Wrap in aluminum foil to keep in the moisture. Ideally, refrigerate the loaves for 2 hours or more before serving. |
Tuesday, November 19, 2013
Texas Recipes Pecan Pie Cupcakes

Ingredients:
1 cup chopped pecans
1/2 cup all-purpose flour
1 cup packed brown sugar
2/3 cup butter, melted
2 eggs Directions:
Preheat oven to 350 degrees. In a medium bowl, combine all ingredients and mix well. Spray a miniature muffin tin with non-stick cooking spray. (The spray with flour in it works best!) Fill each 3/4 full. Bake in preheated oven for approx 18 minutes.
Easy Homemade Thousand Island Dressing
Found this on the blog linked above. Some really good posts!!
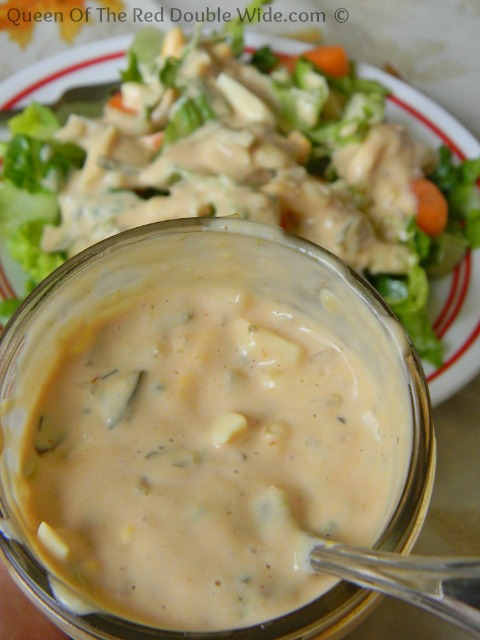
Author: Queen Of The Red Doublewide
Ingredients
- ½ cup mayonnaise
- 3 tablespoons chili sauce or ketchup
- ½ cup sweet relish
- 1 hard-boiled egg, diced
Mix all together
Monday, November 18, 2013
Homemade Cream of Chicken Soup
Ingredients
- 3 cups low sodium chicken stock
- 1 1/2 cups fat-free milk
- 1 cup flour
- 1 tsp dried basil
- 1 tsp pepper
Instructions
- In a medium saucepan cook chicken stock for 15 minutes over medium heat to reduce a little
- In a small bowl combine milk, flour, basil & pepper
- Add in flour mixture and whisk until combined and no lumps remain
- Let mixture come to a boil, whisking occasionally, for 10-15 minutes until thick and creamy
- Let cool and store in airtight container in the refrigerator for up to 2 weeks
Notes
- Each serving, about 1/2 cup, is 5 WW+ points
Nutritional Info
- Calories: 177 Total Fat: 1.6 g Saturated Fat: 0.5 g Trans Fat: 0 g Cholesterol: 1.9 mg
- Sodium: 103 mg Total Carbs: 31 g Dietary Fiber: 1.1 g Sugars: 4.8 g Protein: 10.1 g
Southwest Chicken Spaghetti
 Southwest Chicken Spaghetti
Serves 12
A delicious take on a traditional chicken spaghetti that adds a little southwest flavor to the cheesy goodness.
Ingredients
1 cup Homemade Cream of Chicken Soup (can be found in the member section of the website)
1 lb skinless, boneless chicken breast (3-4 breast filets)
1 tsp pepper
2 tbsp chili powder (divided)
1 tbsp garlic powder
1 lb whole wheat spaghetti
16 oz 2% milk Velveeta cheese (cubed)
4 oz green chilies
1 cup salsa Verde
1 tbsp dried cilantro
1/2 cup fat-free milk
Chicken:
Preheat oven to 350
Line a baking sheet with foil and spray with nonstick spray
In a small bowl combine 1 tsp. pepper, 1 tbsp. chili powder & 1 tbsp. garlic powder
Sprinkle both sides of each chicken breast chicken with seasoning & place in baking dish
Cook for 20-25 minutes or until juices run clear
Cut into bite size pieces and reserve on a plate
Now for the Pasta:
Fill large pot with water and bring to a boil
Salt the water
Cook pasta until desired doneness is reached
Drain and return to pasta pot
And now the Cheesy Goodness:
In a microwave safe bowl combine remaining ingredients
Heat in the microwave for 2 minute intervals while stirring until smooth and heated through
Add chicken to cheesy mixture and stir
Pour over spaghetti and gently toss to combine
Serve into bowls and ENJOY!
Optional Toppings: grated cheese, fresh hopped cilantro, chili powder or sour cream
Notes
Each serving (about 3/4 cup) is 9 WW+ points
**Calories: 325 Total Fat: 10.6 g Saturated Fat: 5.9 g Trans Fat: 0 g Cholesterol: 52.9 mg Sodium: 893 mg Total Carbs: 38.8 g Dietary Fiber: 0.9 g Sugars: 5.9 g Protein: 20.8 g
Friday, November 8, 2013

Thursday, November 7, 2013
Submission in marriage
submitting to your husband doesn't mean he is your master. it means he is the CEO of the marriage. you have to trust him to protect your interest. not always easy but life is way better in the long run.
Ephesians 5:21-33
King James Version (KJV)21 Submitting yourselves one to another in the fear of God.
22 Wives, submit yourselves unto your own husbands, as unto the Lord.
23 For the husband is the head of the wife, even as Christ is the head of the church: and he is the savior of the body.
24 Therefore as the church is subject unto Christ, so let the wives be to their own husbands in every thing.
25 Husbands, love your wives, even as Christ also loved the church, and gave himself for it;
26 That he might sanctify and cleanse it with the washing of water by the word,
27 That he might present it to himself a glorious church, not having spot, or wrinkle, or any such thing; but that it should be holy and without blemish.
28 So ought men to love their wives as their own bodies. He that loveth his wife loveth himself.
29 For no man ever yet hated his own flesh; but nourisheth and cherisheth it, even as the Lord the church:
30 For we are members of his body, of his flesh, and of his bones.
31 For this cause shall a man leave his father and mother, and shall be joined unto his wife, and they two shall be one flesh.
32 This is a great mystery: but I speak concerning Christ and the church.
33 Nevertheless let every one of you in particular so love his wife even as himself; and the wife see that she reverence her husband.
Tuesday, November 5, 2013
How to build a vertical aquaponic system
How to build a vertical aquaponic system


You can turn a small yard, a corner in a community garden or an unused space in your home into a thriving vertical farm for vegetables and fish. A household-sized vertical aquaponic system can fit into a 3ft by 5ft (1m x 2m) area and feed a family year-round. Sean Brady, the aquaponics projects coordinator at the Center for Sustainable Aquaponics and Nourish the Planet in Loveland, Colo., showed us how to build a system from scrap he found around the greenhouse.
More food, less water
A vertical aquaponic system grows vegetables without soil in columns above a fish tank. It is a water-efficient and space-saving way to garden and raise fish. By growing vertically, you can produce about twice the amount of plants as you can with a hydroponic system of the same area. One five-foot tower can produce more than 200 heads of lettuce per year. And it uses a small fraction of the water needed to grow crops in soil.
A vertical aquaponic system grows vegetables without soil in columns above a fish tank. It is a water-efficient and space-saving way to garden and raise fish. By growing vertically, you can produce about twice the amount of plants as you can with a hydroponic system of the same area. One five-foot tower can produce more than 200 heads of lettuce per year. And it uses a small fraction of the water needed to grow crops in soil.
Mutual benefits The aquaponic system puts fish waste to work as fertilizer for crops. A small pump draws nutrient-rich water from the fish tank to the tops of the vertical columns. The water trickles down through the roots of the plants, gathering oxygen from the air as it falls back into the tank. The system is mostly enclosed, with little to no waste and no need for fertilizer or pesticides. And, if you do it well, you won't have to clean the fish tank much.
You would have to replace lost water as needed, power the pump and feed the fish. It might not be too hard to power one of these pumps with a small solar panel or some other renewable energy. If anyone has an idea, please share.
This is how to build Sean Brady's low-cost vertical aquaponic system. All the photos are his, and if you have questions for him, you can contact Sean Brady here or email him at 
Materials:
You can use the following materials or swap out anything for whatever you have on hand. Brady built this system from scrap he had around the greenhouse. We're including pictures of other, fancier systems that he built out of similar materials to show the diversity that this kind of build affords. Measurements are in feet and inches. Sorry, rest of the world.
You can use the following materials or swap out anything for whatever you have on hand. Brady built this system from scrap he had around the greenhouse. We're including pictures of other, fancier systems that he built out of similar materials to show the diversity that this kind of build affords. Measurements are in feet and inches. Sorry, rest of the world.
*Pipes
15-20 ft. of 4-in. diameter PVC or ADS
Four 4-inch elbows
Four 4-inch T connectors
15-20 ft. of 4-in. diameter PVC or ADS
Four 4-inch elbows
Four 4-inch T connectors
*Two 50-gallon drums
*15-20 ft. of pex tubing, or aquarium tubing
*Plastic cups
*Strips of cloth, such as burlap sack, cable ties or another fastener
*Scrap wood
*Two rolls of electrical tape
*15-20 ft. of pex tubing, or aquarium tubing
*Plastic cups
*Strips of cloth, such as burlap sack, cable ties or another fastener
*Scrap wood
*Two rolls of electrical tape
*Pumps
One water pump - the size depends on how much flow it would need. An aquarium pump is enough to keep the flow going.
One air pump (optional). The system can aerate itself but it can produce more if it has an air pump.
One water pump - the size depends on how much flow it would need. An aquarium pump is enough to keep the flow going.
One air pump (optional). The system can aerate itself but it can produce more if it has an air pump.
Tools:
*Power drill or hand drill
*1-in hole saw
*3-in hole saw
*Power drill or hand drill
*1-in hole saw
*3-in hole saw
Build time: About two hours.
Recommended plants and fish:
Leafy vegetables, tomatoes and herbs do well in these systems. So do flowers. You can experiment to find which do well and fit your needs.
Tilapia and trout do well, they grow quickly and they're delicious.
Leafy vegetables, tomatoes and herbs do well in these systems. So do flowers. You can experiment to find which do well and fit your needs.
Tilapia and trout do well, they grow quickly and they're delicious.
Cut the pipe into six 1ft. sections for the sides and two 14in. sections for the ends.
Drill two 3in-diameter holes in each of the 1ft side pieces.
Drill a 1in-diameter hole into the side of one of the end pieces.
Tip:You can use any kind of durable plastic or pipe, not just what's pictured.
Drill two 3in-diameter holes in each of the 1ft side pieces.
Drill a 1in-diameter hole into the side of one of the end pieces.
Tip:You can use any kind of durable plastic or pipe, not just what's pictured.
Assemble the pieces with electrical tape.
Cut the vertical pipes to the length that suits you.
Drill 1in-diameter holes in the vertical pipes, evenly spaced.
Insert the vertical pipes as shown.
The photo on the right shows the mostly finished structure to give you an idea of how it looks.
Drill 1in-diameter holes in the vertical pipes, evenly spaced.
Insert the vertical pipes as shown.
The photo on the right shows the mostly finished structure to give you an idea of how it looks.
Perforate the bottoms of the plastic cups and place them in the holes you drilled in the side pipes.
Cut a piece of 1in-diameter pipe to insert into the 1in hole in the end pipe to make a drain.
The drain should pour into one of the 50-gallon drums.
Cut a piece of 1in-diameter pipe to insert into the 1in hole in the end pipe to make a drain.
The drain should pour into one of the 50-gallon drums.
You can use two 50-gallon drums like these or any other kind of container that holds water for fish. You could even scale this down and put it on top of an indoor aquarium.
Cut the tops off below the rims.
This is the assembled garden structure on top of the drums, seen from two slightly different angles.
Adjust the structure's balance and support its joints with wooden boards. You could tilt the structure slightly toward the drainpipe to improve the water flow.
Most systems will have vertical columns of equal height, but these are cut at different heights to show the range of options available.
Most systems will have vertical columns of equal height, but these are cut at different heights to show the range of options available.
Seed the plants in these. Put them in the cups and the holes in the vertical columns.
The final steps are not pictured, but easily explained. Cut strips of burlap or some other material, fasten them to the tops of the vertical pipes and drape them down the inside of the pipes. Stuffing the pipes with cloth like this will give the plant roots something to latch on.
Next, cut and assemble the tubing so that you can pump water from one barrel up to each of the four vertical pipes. You could also pump water from the barrel that receives drainage to the barrel that feeds the system.
These systems can scale up to commercial size, too. Brady and his colleagues at the Center for Sustainable Aquaponics set up this greenhouse for leafy vegetables, herbs and fish.
Another view of the commercial greenhouse.
This arrangement portrays some of the creativity and even the beauty possible with an aquaponic system. Among its features, there is a rocky waterfall into the fish tank and a drip-irrigation system watering soil-free plants in a rock bed.
These are different views of the above system.
Our guide Sean Brady shows what these systems can produce. He's holding a trout here.
Monday, November 4, 2013
Sunday, November 3, 2013
Friday, November 1, 2013
large area rug DIY for under $30
large area rug DIY for under $30
A few years ago, when I visited my friend Kyrie's dorm room, I was beyond impressed with her area rug. I remember my initial assumption was that she didn't spend a ton of money on it because she just wouldn't have. But I was puzzled because it was seriously the coolest.
I eventually (or probably 2 seconds after walking in the room) commented on it and asked where she got such an glamorous rug.
This might have been the moment I knew we'd be friends forever.
She made it....
with carpet squares and duct tape!
Genius.
It's been a few weeks in the making (trial and ERROR), but I finally have my own DIY area rug- and I L.O.V.E it!


So awesome, right!?!?
I happened to find my carpet squares (randomly) on Craigslist.
But here are a few tips for going through a carpet store.
1. Call around to several places and ask if they sell carpet squares (most do) and what kind of selection they have.
2. Go to more than one store before you buy.
3. I don't think it would hurt to ask if they'd take $1/piece.
They were asking $2 for large squares but I asked. I cut the cost of my project in half.
4. Chances are you won't find enough of the same color to make a monochromatic carpet. But, you should try to stick to one type of carpet to get a cohesive effect.
5. Buy a couple extra squares if you can so that you have more to work with to get a pattern you're satisfied with.
Ok. moving on:

I kind of lost my patients...big time! I didn't take into consideration that Kyrie made a much smaller rug and the flipping over process probably went better for her than it did for me.
But sometimes the best DIYs take some perseverance.
I did a little research, found an adhesive that's made specifically for carpet, and tried again.
I started out by tossing the squares down on the floor and playing around with the arrangement. My first attempt would have actually left me with a completely different layout:

but the second time around I had somehow realized there was another way:

After switching squares around for a little while playing with the colors, I got to the real work. Surprisingly, it took less than an hour.
Here's the adhesive I used. You can find in the carpet department of your hardware store. I payed under $4 a box and used about one and a half rolls.

I used a regular pair of scissors to cut strips. The length varied depending on which seam I was binding, but ultimately didn't really matter as long as you use enough to form a bond.

You then peel off the white piece, lift the edge of the carpet square off the ground, and slide it under halfway. Then firmly press the square back down, take the second square and put it over the other half.

You've got yourself a sturdy seal. Now, just do this until every seam is connected.

There will be some places where the pieces don't quite come together and there is a gap. You can't really tell unless you look closely. I did learn from my experience that my first layout had many more of these gaps because of the number of times four corners came together.

I also bought 4 rolls of shelf liner at the Dollar Store to use as a gripper. I haven't done this yet. The rug is heavy enough that it doesn't slide around. I might do it just to add some protection for my hardwood floors.


There you have it! I am so happy with it. I love how it grounds the room, adding a coziness that was previously lacking. And, of course, I love that the entire project cost under $30!
Subscribe to:
Posts (Atom)